A Bi-Monthly Magazine
Borrowing From Yesterday To Do the Work Of Today
Offering Resources to Promote Self-Sufficient & Back-to-the-Land Living
Hitching Three: Adjustments for Success
The third clinic focused on logging. When Doc enters a situation with a goal,
he starts by assessing the readiness of each individual horse for the task ahead. At
the logging clinic, Doc learned during the assessment phase that the horses
weren't ready to be hitched together. It's not that he couldn't have hitched the
three horses together; it's that he wouldn't. He deemed that it would not have
been a positive experience for the horses nor would it set a good example for
the students. Instead, he and his students spent the clinic time preparing the
horses to work better individually.
One horse was very nervous and fearful when asked to drag even a singletree because of numerous bad experiences. Another horse was inconsistent at standing to be hooked and was inclined to jackrabbit starts. Both of these horses needed to learn to slow down, relax, and be lighter and more responsive on the bit. The horse intended to be the third in the hitch of three was never even brought to the clinic's logging site when it became clear that the other two horses would not be ready to be hitched three abreast. A team of two that was also at the clinic needed to learn to pay attention, be respectful, slow down and work more comfortably and safely. This clinic provided a good example of having a goal in mind but being willing to abandon it if it's not in the best interest of the long-term success of the horses. Rather than disappointment at not getting a hitch of three going, the participants were sufficiently pleased with the progress they and their horses made that they've asked Doc back next year.
At his first two clinics, Doc was able to successfully hitch three horses. The hitches didn't go together identically, though. There were dynamics in each one that made them unique. Differences manifested around line configurations, eveners, and teamster adjustments. Regarding line configurations, three dimensions needed to be addressed: line arrangements, line adjustments, and drop rings.
When hitching three horses together, there are many ways in which lines can
be arranged. Three of the most common will be discussed here. They are, in
decreasing order of teamster contact with each horse's bit:
- lines specially made or modified for driving three abreast;
- team lines used in combination with scatter straps that are anchored
to one of the horses rather than to the team lines. Scatter straps are sometimes called check lines, tie backs or buck reins; - team lines to two horses, with the third horse connected by jockey
stick and buck back rope.
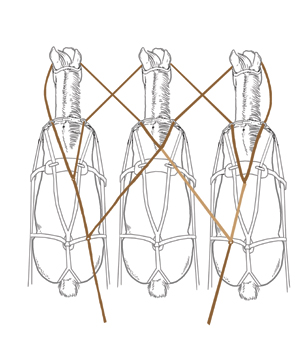
A. This system utilizes driving lines specially
made for driving thee abreast, giving the
teamster direct contact with both sides of all
three bits.
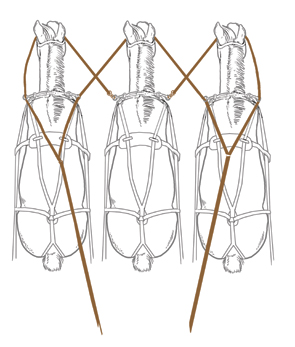
straps, giving the teamster contact with both
sides of the bit of the middle horse but for the outside horses contact with only the outside of their bits.
C. This system utilizes team lines with scatter straps, giving the teamster contact with both sides of the bit of the middle horse but for the outside horses contact with only the outside of their bits.
System A
When working with the Fjord horses at his ranch, Doc had driving lines on hand
that were specially made for driving three abreast. These lines have two cross
checks on each direct line (cross checks are also referred to as stub lines).
“With these lines, I have the potential for direct contact and communication
with both sides of the bit of every horse I’m driving.”
There may be situations where jockey sticks or scatter straps would be helpful
in this system of line arrangements. “If I need jockey sticks to help keep any
of the horses focused on their job—to keep their heads apart, or if I have a horse that’s
resisting the bit and wanting to go its own direction—then I attach the jockey sticks
between the bottom rings of the halters that I always keep on under the
bridles. I’ve also found that when I’m teaching students, sometimes they don’t
maintain good line contact, so the jockey sticks stabilize everything and keep
the horses from getting out of line and getting into trouble while the students are
learning. I’m always prepared to abandon jockey sticks if they’re causing more
problems than they solve. With the Fjord hitch, for instance, we started with two
jockey sticks but took one out because it was too restrictive for the mare and
started to make her uncomfortable. If jockey sticks aren’t available and I need
something to improve our chances of success, additional scatter straps are
better than nothing. Again, they’re attached to the halter rings, not the bits.
I prefer not to have anything interfering with my communication with the horses
through the lines
to the bit.”
System B
In the second clinic that Doc presented last fall at a client’s farm, he used this
system of line arrangement because Susan only had team lines and would not
be driving with lines set up with the extra cross check (system A) for a three
abreast. In this system, the team lines go to the outside, with the remaining
connections accomplished with scatter straps connecting bits to an anchor point
on an adjacent horse. This system is quite common because team lines are
usually available, but it doesn’t allow for as precise communication as System A
since the lines don’t connect with every bit on both sides.
Doc emphasizes that although system B works well and might be easier to hook up and adjust than system A, there is some risk associated with attaching the scatter straps from bits to hame rings. “I prefer not to strap from bits to hame rings as the center horse can potentially move its body in ways that could jerk or apply steady pressure to the bits/mouths of the outside horses. If the center horse should ever rear up or set back, what does that do to the mouths of the outside horses?” buckle into the bits and hame rings, not snap. In fact, all lines should be attached via buckles; snaps should never be used because they can too easily come undone or break and cause a wreck or runaway.”
System C
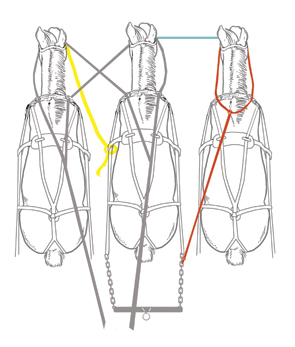
In System C, the third horse is essentially working without lines or scatter straps.
There is no connection from the teamster to either side of the bit of the third
horse. Instead, a jockey stick anchors the horse to its neighbor’s
hame ring.
Doc hooks the jockey stick to the bottom halter ring on the jockeyed horse rather
than to the bit. In fact, a horse good enough to work this way will often work in
just a halter without a bridle. Then while some use a tie back to keep the third
horse from moving too far forward or rely on the jockey stick for that, Doc
recommends a buck back strap or rope attached to the side rings on the halter
noseband instead.
“A buck back rope is a really good safety feature when working a jockeyed horse, especially when they are learning the job. It effectively sets a more precise forward limit on the horse than either a jockey stick or tie back strap, and it teaches them where to work rather than forcing them.
“We have to remember that the lines in our hands connected to the bits in the
horses’ mouths allow us to perform many functions, including communicating
direction and keeping the horses in their proper positions. The jockey stick does
a reasonable job of communicating direction of travel by pulling the jockeyed
horse’s head one way and pushing it the other. However, it is limited
in its
ability to keep the jockeyed horse from getting ahead of or behind his partners.
A horse working on a jockey stick without being tied back or bucked back has
quite a bit of freedom to move out ahead of his partners and can even swing
over in front of the adjacent horse to some degree. There’s
even the chance that the jockeyed horse could get ahead far enough
to pull the evener up onto the legs of the other horses, causing a serious
safety problem.”
The buck back rope prevents this sort of problem by attaching the horse’s nose,
via the halter noseband rings, to the trace chain of the adjacent horse.
“The beauty of the buck back system is it automatically applies pressure on the
halter noseband when the horse starts to get out ahead of his partner’s, and it
releases pressure when he comes back into position. If the jockeyed horse
goes ahead of the partner next to him, he’s pivoting his end of the evener
forward and, as the other end of the evener pivots backward, the buck back
rope which is attached to the evener through the trace chain and singletree,
effectively pulls back on the horse’s nose. The farther he pushes
forward,
the greater the pressure on his nose, and as he comes back into position,
the pressure lessens and disappears. When the buck back is adjusted properly,
there is no pressure on the nose when the horse is where he should be.
“Again, the horse feels pressure every time he gets his nose out a few inches ahead and then gets complete relief when he’s in the right place. This system isn’t just holding the horse back; it’s teaching him where to be – where the comfort zone is. With just a jockey stick, he can get quite a ways out ahead without a consequence. He can pull forward and push in, but there’s nothing to teach him to stay in the right place.”
“Sometimes the jockey stick is attached to the hame rather than the halter ring of the center horse. While this arrangement better limits forward motion out of alignment, it isn’t as effective in communicating direction, and it still doesn’t teach where the proper position is. I think a buck back strap or rope is all around better for maintaining alignment in front. As teamsters, we really need to be focused on creating non-events. Safety features like buck back ropes give us advantages and improve our chances for success.”
Comparisons
The second pair of cross checks on the lines specially made for driving three
abreast (system A) are longer and buckle onto the direct lines further back than
normal cross checks do. These lines should also be more adjustable, with lots of
holes. Adjusting these sorts of lines can be more challenging than team lines
because each time you move a cross check buckle, it affects the bit setting on
three horses instead of two. On the other hand, the driver can communicate with
both sides of the mouth on all three heads consistently with this line
arrangement. With team lines and scatter straps/ tiebacks (system B), the
teamster is only communicating with both sides of the middle horse’s bit. The
team lines and scatter straps combine on the other two horses. And in System
C, the jockey stick is pushing or pulling the third head with no direct
communication from the teamster at all.
Doc says, “I like to be driving each horse. If I do go to the team line with the scatter straps, then I feel like I’ve already given up my ability to communicate with that side of the outside horses’ bits. When I have a direct connection with both sides of every bit, I can set the best rhythm, and I can reward, comfort, encourage, or stimulate the horses to get the best performance possible.”
Once the lines are in place using whatever arrangement system, it’s then time to adjust them. “The lines are a system of control and communication. Our goal is to adjust them so that each horse will feel and respond to the limitations, pressures and cues in a way that will encourage them to be comfortable, stay in the proper spatial position and alignment, and respond appropriately to requests from the teamster. For comfort and function, each horse should be working with a straight axis from head to tail when going straight forward. The body axis of each horse should be in line with the center of its single tree and parallel to that of the other horses and to the line of travel (lateral alignment). If a horse feels unequal contact on the two sides of the bit or the bit is angled in his mouth, he will either bend his head to one side or change the angle of his body axis to compensate. In either case, comfort and function will be compromised.
“We also want to adjust the system to get the horses lined up front to back so that their noses are all in a straight line perpendicular to the line of travel and to the axes of their bodies. Adjustments can be approximated before starting out, but corrections are usually required as the hitch is first driven. I like to back the hitch a short distance before going ahead the first time and also after making any major adjustment because backing tells us a lot about proper alignment of the heads. Going back a little also tends to counteract the tendency of horses to start forward with too much energy. Don’t be surprised if fine tuning of adjustments is an ongoing proposition as the horses settle into the work and as their energy and moods change from day to day. Different types of work and equipment will require adjustments as well.”
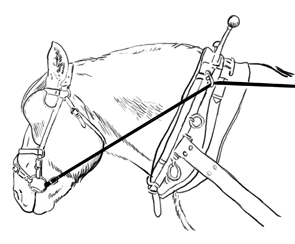
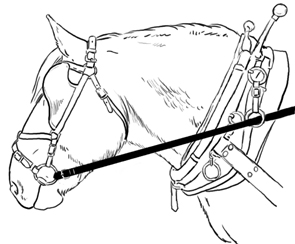
When the lines are strung through the top hame ring, the steep angle can send the wrong messages to the horse.
Adjustments in System A will be made by moving the check lines and using drop rings and sometimes spreaders. Adjustments in System B will be made in the check lines, scatter straps, drop rings, and in some circumstances spreaders. In System C, adjustments will be made in the check lines, drop rings, buck back, and, if used, spreaders.
The length of the jockey stick is important, too. "We generally have 42" and 36" jockey sticks," says Doc, "because we constantly work horses of different sizes and different distances apart. Our jockey sticks have bull snaps with swivels on the ends. We have various options of where to hook them. They can be hooked halter to halter, halter to the bottom hame (breast strap) ring, or halter to the chain on the hame fasteners we use; this puts the end of the jockey stick at the bottom center of the collar. With the same length jockey stick, hooking from halter ring to breast strap ring puts the horses the farthest apart; halter ring to hame fastener gives the least distance between horses, and halter ring to halter ring gives an intermediate distance."
An important part of line adjustment is often overlooked, and that is the angle at which the lines leave the horses’ bits. “Here we’re dealing with not only the dynamics in multiple horse hitches but also problems with how lines are conventionally configured in the first place,” says Doc.
The conventional line arrangement in draft harness has the line going through the top hame ring. For most horses, it is too high. “I learned this from Les Barden in New Hampshire. Unless a horse is built with very high head carriage naturally, we’re pulling up on the mouth at an angle that isn’t good (see line drawings). You can’t get the best responses for slowing and turning, and often the horses just aren’t comfortable. The upward pull communicates to the wrong part of the horse’s mouth and can send unintentional messages to the horse.” Doc has come to rely on drop rings (sometimes called line holders) to resolve this issue. “I use them all the time to lower the angle of contact and pressure on the bit from the lines. I hang the drop rings from the line rings on the hames. This lowers the lines by four to six inches and cuts in half the angle of the lines with the horizontal. I see tremendous differences in the comfort and responsiveness of my horses, especially when starting them. Depending on the situation, I may hang the drop rings even lower, from the back strap rings on the hames for instance, but the lower the lines end up, the more careful you have to be that they don’t get tangled with the shafts, driving single. You also can’t go too low with the drop rings with team lines – System A, etc. – or the dynamics of the cross checks are affected.”
With Doc’s first set of three horses being hitched, the Fjords, not only did Doc have to adjust the check lines to get the horses’ noses lined up correctly and to get the lateral spacing right, he also had to account for the horses being different heights. The mare that he added to the team of geldings was nearly a hand shorter. Because the cross check lines go from one horse to another, when horses are different heights, the angles that the cross checks take from one horse to the other will vary and can potentially create different angles of pull on the two sides of the bits in the horses’ mouths. Doc has found drop rings to be especially important for solving these sorts of issues. “The main point is to keep the lines coming into each individual bit at the same upward angle on each side. Where the drop rings are hung on the hames may need to be different side-to- side to achieve this. Drop rings are really handy because they can be unbuckled, moved, and reattached to get the perfect position – all without having to rethread the lines.”
If spreaders need to be employed, it’s important to adjust their length after seeing how they hang when driving. “It doesn’t work to simply select spreaders and hang them from the hames so the rings are the same level as the drop rings on the outside of the horse. This is because when the lines are actually functioning as we drive, the spreaders are pulled to the center and up by the cross checks. So either longer spreaders or attaching them lower on the hames would be required. How long, and/or how high or low they should be attached can only be determined by comparisons made while driving. Spreaders that are adjustable in length are handy for getting the adjustment just right.”
The second three abreast hitch that Doc facilitated last fall was his client Susan’s. She had purchased a three horse evener system for her wagon, but she hadn’t gotten it completely installed. It was a special offset type which allows for two horses on one side of the tongue and one on the other and does not require an offset hitch point. Because of limited time and a desire for a successful outcome, they chose instead to use Doc’s centerfire scissor type evener on Susan’s forecart. Her forecart had a centered tongue and was set up for her team. It had a moveable hitch point, however, so they pulled the pin, moved the hitch point, and replaced the pin. A moveable hitch point was what made it possible to use the centerfire evener with a centered tongue.
Another consideration in using a centerfire evener with a tongue is the amount of space between the tongue and the horses on either side of it. “You don’t want it so close that the horses’ back legs are getting beat up by the tongue on turns,” says Doc. “The spacing will depend on the centerfire evener dimensions and the size of the horses. If a job doesn’t require fast work or tight turns, you can work with tighter spacing. However, in situations like a forecart or logging arch in the woods, I want those horses to have plenty of room to use their feet without stepping on each other.”
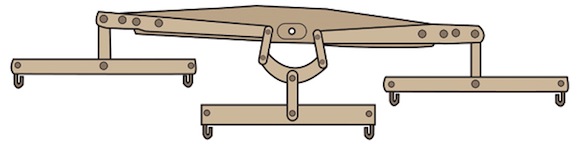
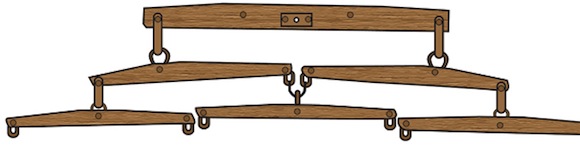
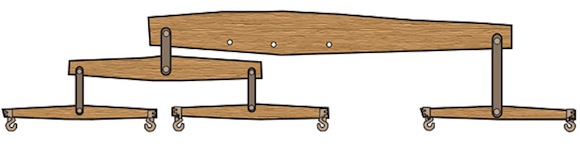
Generally, the type of evener chosen is determined by the type of equipment being used. "A centerfire is appropriate when you want the horses well centered in front of the hitch point, for instance on a harrow. But to use one with a centered tongue will require an offset hitchpoint. Another option is a centered hitch point and an offset tongue."
As seen in the evener diagram, offset eveners often have spacing that allows room for a tongue between two of the horses. And while offset eveners have fewer moving parts and are therefore easy to manufacture at home, for them to work correctly, the dimensions are important. They can be made in different lengths to give different spacing of the horses. However, for the load to be shared equally by all three horses, the distance from the hitch point to the connection point of the single horse's singletree must be twice as long as the distance from the hitch point to the connection point of the double tree for the other two horses.
Susan's hitch of three consisted of two well-broke geldings that had been trained together with a well-broke mare added on the left. The hitch had lines arranged using System B: team lines with check straps and drop rings. Because the mare was a bit more forward and new to three abreast, Doc jockeyed her to the center horse. Doc and Susan noticed some dynamics while turning, that teamsters should be aware of. First, Doc pointed out that when he signaled for a left turn, the right hand horse was slow to respond compared to the other two who were being cued directly with a live line. There was a predictable delay in him receiving the cue from the scatter strap until the center horse's shoulder started to go left. This effect was less evident on right turns because the jockey stick hooked halter-to-halter cued the mare on the left as soon as the center horse's head started right in response to the cue on the right line.
Susan found that her outside horses were not coming around on the turns as well as she liked. She learned to slow down the horses on the inside of the turn so the outside horse could get around better. The wider the hitch, the greater the distance the outside horses have to go on the turns compared to the inside horses. Doc finds it works better to give the outside horses plenty of time rather than hurry them and possibly make them uncomfortable.
Susan also discovered that, with a wide hitch, you need to shorten and lengthen more line on the turns than with a team of two. The more horses side by side in an abreast hitch, the more outside line you must let out to make a turn, and then, the more you have to shorten back up to straighten out after turning. The sharper the turn, the bigger this effect will be.
Finally, Doc teaches his students a rhythmic pressure release style of communicating with horses through the lines when driving. By alternating pressure and release in a rhythmic fashion, the teamster has "conversations" with the horses through the lines. As the students in the clinic at his ranch as well as Susan learned with the three abreast hitches last fall, the skillful use of this technique has powerful results in keeping horses in multiple hitches comfortable, soft, responsive, and working in alignment.
Setting Ourselves up for Success
How three horses come together to work varies. Sometimes it's best to not
force them to work together but instead improve their individual work ethics,
as Doc demonstrated at his logging clinic. Then if they are ready to work
together, the dynamics of lines, eveners, and teamster capabilities require
that we pay attention to the details to ensure success. There are choices
we can make – use of jockey sticks, special double crosscheck lines,
drop rings, and buck back straps – that can enhance our chances
for safety and success.
Doc concludes, "All of the equipment and adjustments in the world will be of
little use if we don't have trusting, respectful horses that accept and respond
to us as their leader. To be safe and get things done, we need comfortable,
relaxed, and responsive horses that will stop, stand, drive and work without
being anxious, upset, nervous, or fearful. To be safe and to be fair to our
animals, I feel we need to perfect our relationship with our horses single and
then work up to a team of two before attempting to put our horses into larger
hitches. Humans that ask for too much, too fast, too soon cause a lot of
problems for horses and mules." ![]()
This article appeared in the February/March 2012 issue of Rural Heritage magazine.