A Bi-Monthly Magazine
Borrowing From Yesterday To Do the Work Of Today
Offering Resources to Promote Self-Sufficient & Back-to-the-Land Living
DIY Spreader
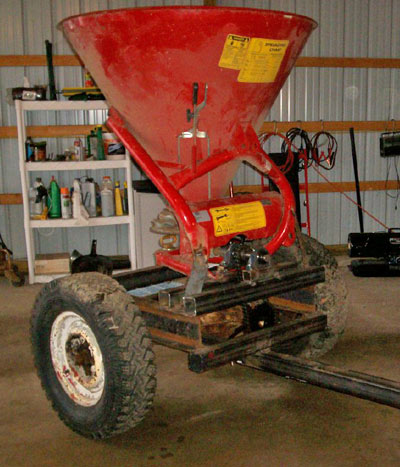
The completed spreader
I don’t use commercial fertilizer on my farm, so I could see no need to have a spreader. I started using a power take off broadcast/fertilizer spreader to plant “bin” oats. I broadcast the cheap oat seed onto last year’s corn ground after fitting it down, then bale the crop rather than combining it. This method allows me to mow the crop before ragweed, and other noxious weeds become a problem. The stand is good e n o u g h to nurse a hay crop and get it established. The animals enjoy the oat hay and it fits well in my farm plan.
I used my tractor to spin on the oats and hay seed and thought about my buddy’s design and yet another job the horses could do. I also found a supplier for organic pelleted fertilizer and soil amendments. Once again the broadcast spreader was used to apply these soil builders. The more I drove the tractor to do such an easy job, the more I was disgusted about burning fuel and watching my horses stand in the pasture and watch me.
Last spring, 2009, I made a trip to Jonathan Lawton’s farm. I got there in time to watch him top dress some corn with a fertilizer spreader he had built from a truck rear end and a PTO driver broadcast spreader. He built his prototype mostly from wood because he had the wood on hand. The spreader worked like a dream. The horses pulled a forecart with the fertilizer spreader hooked behind it. The rear end of the old truck turned when pulled across the ground, so a gear drive assembly was fashioned to supply power to the spreader. The fertilizer flew out of the spreader covering a 40 foot arc. In no time at all the fields of corn were top dressed, the horses were worked, and sustainable agriculture was practiced.
Inspired by my friend Jonathan, I resolved to build a fertilizer spreader of my own. I enlisted the help of my Uncle Fred, a welder and fabricator in his own right, to help me. We acquired a rear end out of an old Jeep. We cut all the unnecessary parts off the rear end, like brake drums and such to lighten the axle and keep mud from having a place to build up. We checked the rotation of the gears to get the wheels running in the right direction and figured out the ratio needed to drive the spreader.
The ratio part still puzzles me. I know that I wanted the s p r e a d e r to turn at approximately 540 revolutions per minute while the horses pulled the spreader 4 miles per hour, the walking speed of most horses. I turned to Jonathan for the technical expertise to get this all right. I marked one tire and rolled the axle across the ground. I needed to roll it so the tire made one complete revolution while counting the number of turns the transmission/rear-end made. This took two people, one to watch the tire and the other to count the revolutions the yoke made. I also found a gear ratio stamped on the “pumpkin” of the rear end and offered all this information to Jonathan. He told me I needed two gears, one 3 inches and the other 7 or 8 inches, depending on what I could buy. This ratio worked out to a little less than 3-to-1. I am sure there are folks out there who understand this part very well, but I am not one of them. Once you get the information I wrote about, take it to a machine shop and ask for help if you need it. I am also sure most engineers or even a student good at math, could help you with this part.
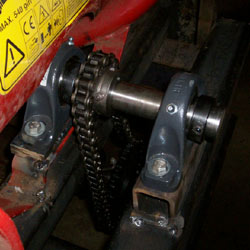
Now that we knew what we needed for sprockets/ gears, I went to our local farm store. We have a Tractor Supply Company store near us. They carried everything I needed. I bought the sprockets, drive chain and two pillow block bearings from the store. We raided our equipment graveyard for a power take off shaft to cut down to fit the spreader’s splined shaft. We next went to a local steel distributor to buy the steel needed for our frame work. I already owned the fertilizer spreader, and the rear end from the Jeep was free. I used welding supplies, various bolts from my bin and will paint it, when our winter weather breaks, with paint that was bought for another project.
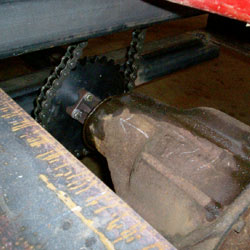
We pulled the old drive shaft yoke from the transmission, took it to a friend who centered the largest sprocket then drilled and tapped it into place. He found center by placing it in a lathe and marking it. The next part the machinist did for me was cut the power takeoff shaft down to fit the splined shaft on the spreader, and welded it to a short axle to complete a jack shaft that would supply the power to the spreader. This man is my friend and I help him with livestock questions and supply him with feeder pigs. A pizza, some doughnuts and good conversation was all that I had to pay for his services. Networking and friendship wonderful things! We wanted the fertilizer spreader centered on the frame to keep it balanced. We slid it slightly forward, just over center, to keep a little more weight on the tongue. I will be pulling this behind a forecart but still wanted it neither tongue-heavy nor rearing backwards especially when loaded. To accomplish this, and to get the spreader up above the tires, we used six-inch “I” beams for the main frame. Using 3"x3" box channel for the cross members worked out very well too. The cross members worked to mount the spreader as well as provided a place to fasten the jack shaft and drive chain assembly. We mounted the spreader in such a way so as to replace it when needed or remove it if it didn’t work. We spot welded it on the bottom of the spreader’s frame as well as provided two stabilizer bars to prevent side-to-side rocking. The rear of the spreader frame had a hole for a hitch pin. We put a pin in the hole and then welded the hitch pin to the fertilizer spreader’s new frame. The pictures show these details better than I can explain.
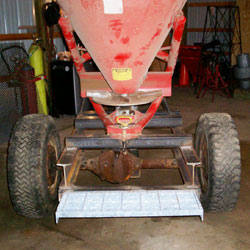
I was worried that I might back the spreader into something by over-exuberant horses. So we added a step bumper to the rear of the spreader. This bumper is a stair tread from a steel set of stairs, but grating part off before putting the machine away. My spreader is direct drive. In other words, if the wheels are turning, the spreader is also turning, no matter what direction. I plan to only use this here on my farm and would transport it by trailer if I were to use it somewhere else. I could pull the master link in the chain I guess, but simply don’t see the direct drive as being a problem.
We have trialed the machine with kitty litter. It spreads a nice fan spray of 30 to 40 feet. I look forward to using this simple, effective machine this spring and summer. The fertilizer spreader provides one more way to work horses, and the uses for this machine on my farm are many. The best part was the cost to build it. I include only the cost of materials because in winter we are looking for ways to use our time anyway.
Purchased steel: $144.04
Sprockets, chain and pillow block bearings: $84.20
Consumables; welding rod, electricity etc: $30.00
Fertilizer spreader bought new 4 years ago: $360.00
----------------
Total for my farm-made Fertilizer Spreader $618.24.![]()