A Bi-Monthly Magazine
Borrowing From Yesterday To Do the Work Of Today
Offering Resources to Promote Self-Sufficient & Back-to-the-Land Living
DIY Hay Rake
Historically, items like hand hay rakes were built on the farm. Now, many hand implements look good on a rack in a big-box store but pale when compared to a tool designed for the job. For less than the cost of buying a metal garden rake (which makes a poor substitute, anyway), you can build a hay rake that works much better. I’ll outline the process of building a sturdy, inexpensive hay rake using tools and materials accessible to a small farmer. I’ll touch on adapting the process to the tools available as well as varying the design to fit particular tasks.
Most hand hay rakes consisted of a handle, a head and one or two wooden braces bent into a half circle. This kept the tool solid, yet lightweight enough to use for an extended time. Starting with this design in mind, our process begins.
The considerations for this project are:
- Usefulness: When completed, you’ll end up with a tool that will function well in the hayfield.
- Ease of construction: Anyone with a basic set of tools can complete the job in a few hours.
- Affordability: A few companies currently sell wonderfully made rakes that are beautiful and durable for around $80. Some versions of the rake presented here use about $10-15 in materials.
- Adaptability: With the low material cost and a rapid learning curve, you may be encouraged to build several rakes (they’re fun to build!) or modify the one you do make to fit other tasks like gardening or raking a lawn.
- Lineage: This rake descends from historic examples, adapting rather than slavishly copying their design.
To begin, choose a size for your rake. I have yet to make a rake that is really too big, so consider generous proportions.
Last year, I made a prototype rake with a 32-inch head and a 6-foot handle, giving it to my friend Matteus to try out on some
scythe-cut hay (rather than his metal garden rake). His feedback was, after a couple of weeks, was, “It’s perfect.
” But, when I asked if I could add some length to the handle, he agreed that 6 inches, or a foot, or 18 inches, would
improve the design.
For a first rake, consider starting with a 30-inch head on a 7-foot (84 inch) handle, which seems large until you use it. If it
is too large, trimming the head and the handle is certainly easier than stretching them on a completed rake.
The next step in design is to choose a joinery method: The first and simplest version simply features a head with a round mortise
and a round handle bolted together, using heavy wire as a brace, either in a half-circle arc or a pair of braces. I have used a
rake like this for years, and, while the arc has worked its way loose, the rake still provides regular, effective service.
Adapting this design is pretty straightforward. Instead of the wire braces, steam-bent or green-bent wooden braces can be used,
typically secured with a brad nail. Many rakes built like this survive today -- a testament to the design-- and they look handsome.
However, for the scope of this project, they are a little more complicated to build.
The other traditional design features a split-shaft, where the handle itself acts as the brace. Once an easy method of “
splitting” the handle can be managed, the result is a lightweight, handsome and durable rake. From there, we move to the
rake head. For dry hay, ⅜-inch or 1/2-inch diameter tines of about 4 inches in length work quite well. For grass, from a
lawnmower for instance, 5/16-inch to ⅜ inch diameter times of 2 and a half inches make more sense.
Two suggestions for materials would be pine and ash. Most home centers stock clear pine in a 5/4 (1 and 1/4 inch) thickness. For a handle or two, especially as a prototype, an 8-foot, 6-inch wide board should suffice. In the upper Midwest, a great and traditional wood for rakes is ash. More likely available from a sawmill, a single board a full inch thick can supply heads and handles for a couple of rakes easily enough.
Finally, your rake will need tines. While not traditional, hardwood dowels make very useable tines. For a lesson on making traditional tines, probably no better source exists than Roy Underhill’s book The Woodwright’s Shop.
To make a blank, rip a board to 11/2 inches in width. This will supply the four strips. Next, draw a cabinetmaker’s triangle (a simple triangle shape drawn on one face, which makes a handy reference to keep all of the boards facing the same direction) on the top face of the blank. Then, drill two 1/4-inch holes through the blank – one an inch from the butt end and one 16 to 18 inches from the head end. These will be used to align the strips and to secure the split.
At this point, rip the blank into four strips on a table saw, with each strip just over 1/4-inch thick. Now you have – with the saw kerfs being reduced to sawdust – a handle that will be about an inch square.
An alternate method: I have experimented with a onepiece handle. From a blank, that is about an inch square in cross section, I use a bandsaw or a sharp rip saw to rip a kerf down the center, about 18 inches from the head end. Then, I rivet or bolt the handle together just past the “split,” or kerf. From there, a springy hardwood like ash or oak can simply be wedged apart and held in order to go on to step 5.
If using this method, the split end may be narrower in order to avoid breaking the handle. Although steam bending would alleviate this concern, it would add another, complicated step and require some specialized equipment. Also, take care to avoid letting the split pinch your fingers along the way.
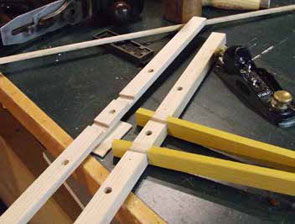
The holes you drilled in the previous step come in very handy now, as you can bolt the strips together with a 1/4-inch carriage bolt for alignment and to begin the clamping process.
Next, quickly insert a V-Shaped block to open the split and clamp it all together. I use around a dozen clamps when doing this, and that is about the right number. Let the glue cure 24 hours before removing the clamps, and the “V” shape at the end will remain rigid and in place.
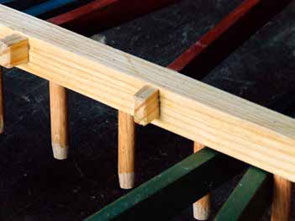
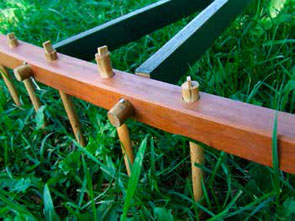
Next, drill the head for tines. I use dividers to mark off spacing somewhere between 2 and 3 inches (wider for hay, and narrower for grass, although the spacing isn’t a critical dimension) and a drill press to drill 3/4-inch deep holes. Simply laying them out with a yardstick or tape measure and drilling by hand with a power drill or bit and brace works as well. I once had my high school students drill a rake head by hand and, even as beginners, they ended up with a functional, if rather varying, layout.
Angling the holes for the tines just a few degrees is a nice touch but is not necessary for the rake to work well. Finally, decide on the head-to-handle attachment method you’ll use. If you’re using through tenons, you’ll layout and drill the holes in the next step. If you’re making a “lap joint rake,” you’ll need to rip the head into two pieces to begin the joinery for the assembly.

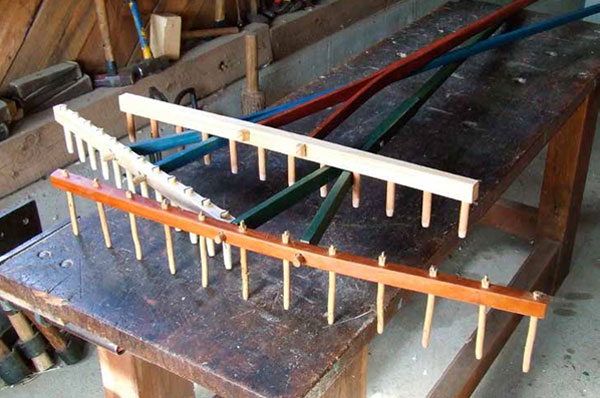
Head joint half-assembled.
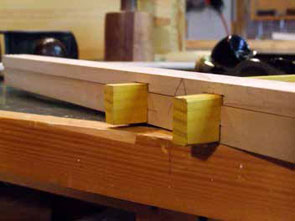
With the split handle you’ve made, you can create one of two sturdy joints for attaching the head. Each has its pros and cons.
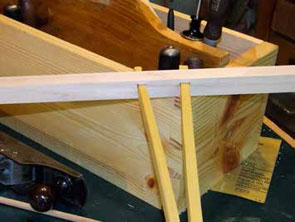
First, you can shape the end of each “split” into a round, 1/2-inch tenon about 2 inches long with some combination of chisels, spokeshaves, rasps or files, or even a router with a round over bit. Then you drill a pair of mating holes in the head, trim the tenons for a precise fit, and secure the head to the handle with a bent nail, a cotter pin or something similar.
Alternatively, and adding a bit of complexity to your rake, you mark out and create matching dados (cross grain grooves) in both the head and the ends of the handle, then assemble the entire rake as one unit using waterproof glue. (See botom left figure above.)
For this method, I usually cut and chisel out the dados by hand, going for a tight fit. The nice thing about this method is that it creates an incredibly stiff, yet lightweight rake assembly. The downsides lie in the extra complexity of the process and in losing the ability to repair the rake if something breaks. I’ve yet to have a rake fail in years of pretty regular use, so this concern may be small.
Here is the fun part. Plane down the glue lines, then use a spokeshave to make the handle into an octagon. Then, take off the edges of those facets. At this point, the handle has 16 smooth sides, making it nearly round. Rounding it from there is easy, but a faceted handle is a fine place to stop, too.
As an alternate method, hand or power sanding can smooth out the glue lines, and a round-over bit in a router can quickly shape a handle. I like to leave the first 20 to 24 inches of the handle square, then transition into the octagonal or round part of the handle for the rest, but that’s mainly a style choice. Let vanity be your guide.
I have several rakes with tines made from hardwood dowel, and they last just fine for working with hay. A garden rake might see heavier use and would require riven tines. Dowels from big box stores are notoriously a little off from their nominal dimension, but with a touch of glue I’ve only lost one tine in six years. If one breaks, simply drill out the remaining end and replace it.
A note onlost tine: The only rake to lose a tine was my first one, which gets the most use. I lost it almost immediately (beginners’ error, no doubt), but I’ve never replaced it, or missed it, really.
For rakes with traditional tines split out from a log, I usually drill the tine holes all the way through the head, elongate the hole slightly, and wedge the tines in from the top, like a Windsor chair joint. While certainly overkill, it makes for a fancy-looking rake head.
While it’s possible to assemble the rake in step 6, waiting until now makes more sense. A long, straight handle is easier to shape and work with than a fully assembled rake. For a round tenon rake, no glue is necessary. Just slip the tenons through the head, drill a small hole for the “pin” of your choice -- a bent finish nail works like a charm, and insert the pin.
For a lap-joint rake, simply glue the two parts of the head back together in a sandwich over the lap joint in the handle. Again, waterproof glue will form a bond stronger than the wood itself and will last for many years.
A little hand sanding on the handle goes a long way toward comfort at this point. Then, choose a finish. Rakes typically are stored by hanging and used in dry hay, so they can survive years with no finish at all if you prefer. The most common finish remains boiled linseed oil, cut 50:50 with mineral spirits or turpentine. Two coats of this create a durable, long lasting finish, but a refreshing coat each fall is a good idea.
I often like to add one more step, painting the handle with milk paint (which comes in a mix to be added to water). This was not usually done in the past, but it dresses up a rake a bit and also allows me to try out paint combinations for future furniture projects. Oh, and garish colors reduce the chance you’ll walk away and leave a rake in the hayfield overnight. Don’t ask how I know this.
Beware though, using milk paint requires faith: After one coat, you’re sure the finish is ruined. The second coat looks a little better, and once you’ve rubbed that down and added an oil finish, you’re a believer.
For a small amount of hay or mulch with a scythe, a hand hay rake is a joy to use. Keep your touch light
when tedding and rolling up windrows for loading, and your rake will last for years. You’ll take pride in
working with a tool you crafted yourself.
![]()